You can easily map your blogger’s blogspot blog to use a custom domain name from your cpanel using this tutorial as your guideline. I have also included tips to help you use a sub-domain instead of the root address for your custom domain name.
Below is my step to step guides to help you achieve this easily.
- Assuming you already have an active website and just interested in using the sub-domain on your old blogspot blog.
==> Log in to your website cpanel
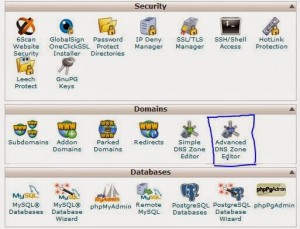
==> Locate “domains” ==> Advanced DNS Zone Editor
==> Select the domain name you want to use from the drop-down list
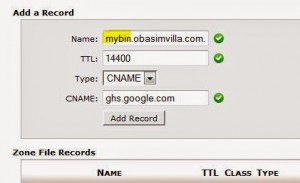
==> Create a “CNAME” record to point to google’s server using the details below;
- CNAME (Alias) = The sub-domain you intend using. (eg. blog.mysite.com, news.myplaycite.com etc.)
- Pointing to = ghs.google.com
- TTL = 14400
See the image below for the demo;
==> Tap the “Add Record” button to save your settings
==> Log in to your blogger dashboard
==> Click on settings –> Basic –> Blog address –> + Add a custom domain (Point your own registered domain to your blog.)
==> Enter your new domain name and save (at this point, google will tell you that you must claim your domain name first)
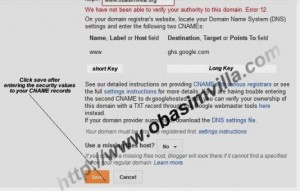
==> Now take note of the secret keys google generated for you after the warning message (That’s what we need for the final steps)
==> Create another “CNAME records” using the values below
- CNAME (Alias) = short security key
- Pointing to = long security key
- TTL = 14400
==> Tap the “Add Record” button again to save your settings
==> Now, you need go back to your blogger’s dashboard and add the custom domain using the sub-domain prefix you ‘ve chosen.
- Assuming you have just bought a domain name you intend using
If this part applies to you, you will need created your “CNAME” records with “www.mysite.com” instead of the sub-domain.
Eg. where we have “mybin.obasimvilla.com” will normally be changed to to “www.mysite.com” assuming this is the domain name you bought.




Great tutorial! The step-by-step instructions on adding a custom domain and sub-domain to Blogger through cPanel are clear and easy to follow. I especially appreciate the screenshots—they really help visualize each step. Including a product video to demonstrate the process would make it even more user-friendly. For anyone new to cPanel or custom domains, this guide simplifies the process, and the tips on DNS settings and propagation time are spot on. Thanks for making it so accessible!
Awesome guide, your blogs are really nice and I really like you content.
Thanks for sharing us.
I got this one. it is quite helpful to me.
When I enter the long code as TTS at cpanel it says “TTS value must be a positive integer”
Long code isn’t supposed to be at the TTS Naimul, that should be 14400 instead, the long value seats at the space for the second Cname value.
Hope this helps?
I followed the same dns configuration settings but it does not work do i need to wait for upto 72 hours to see the change. also how to handle blog www and non www duplication issue in case we are using blogger as subdomain i.e blog.domain.com
Certainly you aren’t gonna have any concern about that when using a sub-domain ‘cos it isn’t going to happen at all.
But when you are using your mail domain name, you can simply trash this point by;
Clicking on change blog address again –> add custom domain name –> forward http:// to www
If after 72 hrs your sub-domain doesn’t start mapping correctly, your server might need you to point to the following google IP addresses;
216.239.32.21
216.239.34.21
216.239.36.21
216.239.38.21
I have already treated all that in my previous tutorial here [ https://www.3ptechies.com/blogger/setup-custom-domain-godaddy-blogger.html ]
thank you for sharing this information