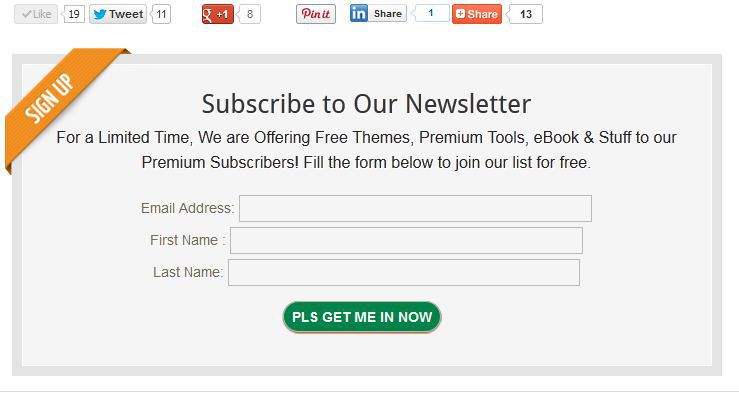
Adding mailchimp subscription opt-in form to after post content in genesis and wordpress blog in general without using a plugin has been a question in my mind so as every other blogger who has idea on how modern internet marketing works.

At first I had difficulty choosing the best auto-responder and opt-in form provider for my business & promotions among the many competitive companies offering the services. What came on my mind at first was trafficwave.net ‘cos of their 30 days trial account before I stumbled upon this other ones below :
- Aweber
- Getresponse
- Campaign Monitor
- Icontact
- Constant contact
- Trafficwave
I was like wow these are really decent options for me. Finally i decided to go with mailchimp.com since they are offering free account for 2,000 subscribers or less which has made it one of the most used company among the list above .
How to add mailchimp subscription op-tin form to after post content, before comments in genesis theme without using a plugin
Assuming that you are already a mailchimp services user, here are the steps to follow to add your subscription form . You can also create a free account if you don’t have any yet
- Create a list (maybe my blog below content)
- Create a signup form embed code (by going to list ==> for your website ==>create a signup embed code )
- Copy the generated code and paste it in a text editor (notepad recommended )
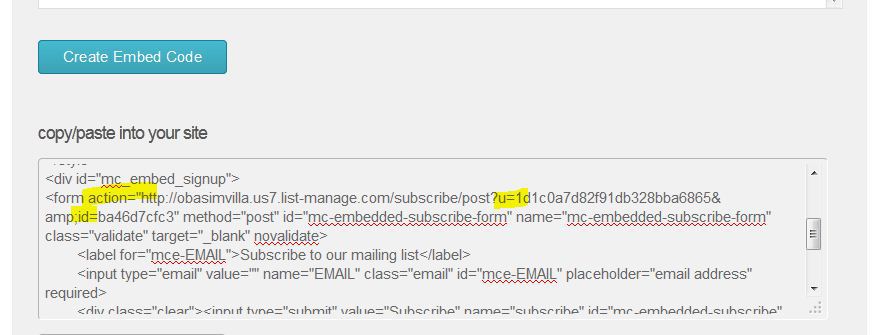
- Copy only the form action area and post it in an open notepad window taking note of the following parts ; form action=”” , u=”” and id=”” as highlighted in the screenshot below
 Configuring the mailchimp Subscription / opt-in form :
- Open a blank notepad window and paste the code below in it (Assuming you followed the four steps above correctly)
<div id="newsletterbox">
    <div class="white-border">
        <div class="newsletterbox-wrap">
<h4>Subscribe to Our Newsletter</h4>
<p>For a Limited Time, We are Offering Free Themes, Premium Tools, eBook & Stuff to our Premium Subscribers! Fill the form below to join our list for free.</p>
      <form id="mysubscribeform" method="post" action="http://obasimvilla.us7.list-manage.com/subscribe/post?"
      name="mysubscribeform">
        <input value="1d1c0a7d82f91db328bba6865" name="u" type="hidden" /> <input value=
        "ba46d7cfc3" name="id" type="hidden" />

        <div style="margin-bottom: 5px;">
          Email Address: <input value="" size="50" id="MERGE1" name="MERGE0" type="text"
          style="border:1px solid #BBBBBB;font-size:12px;padding:5px;" />
        </div>

        <div style="margin-bottom: 5px;">
          First Name : <input name="MERGE2" id="MERGE2" size="50" value="" type="text"
          style="border:1px solid #BBBBBB;font-size:12px;padding:5px;" />
        </div>

        <div style="margin-bottom: 5px;">
          Last Name: <input name="MERGE3" id="MERGE3" size="50" value="" type="text"
          style="border:1px solid #BBBBBB;font-size:12px;padding:5px;" />
        </div><input value="Pls Get me in Now" type="submit" style=
        "-moz-border-radius:5px 5px 5px 5px; background-color:#990000; border:1px solid #BBBBBB; color:#FFFFFF;cursor:pointer;font-weight:bold; padding:5px;" />
      </form>
</div>
    </div>
</div>- replace action=”add your mailchimp action url stopping at /post?”
- replace u=”add your mailchimp u action without &”
- replace id=”add your mailchimp id ” As seen in the code and screenshot example above
- click on file ==> save ==> save it as => newsletter.php
Implementing the mailchimp form on your WordPress site (Using the Genesis Framework )
- Upload the newsletter.php you have created above to your server (please make sure you are uploading to the same directory where your child theme is installed ) in same folder with function.php and style.php
- Navigate to ==> Appearance => Editor from your wordpress admin dashboard => click on function.php
- Create a backup copy of your function.php and add the code below to the last line of your function.php
/**obasimvilla.com/easily-add-mailchimp-subscription-op-tin-form-to-after-post-content-in-genesis-without-a-plugin */
function add_newsletter_box() {
  if(is_single())
  require( CHILD_DIR . '/newsletter.php' );
}
add_action ( 'genesis_after_post_content', 'add_newsletter_box', 10, 1);- Click on save to store your new settings
- Finally you need to add style to your newsletter opt-in form, Just copy the code below and add it to the last line of your style.css or simply paste it in the custom css window (some part in this css are not just useful for this tutorial alone but also for others who might want to use feedburner instead of Mailchimp)
/* obasimvilla.com/easily-add-mailchimp-subscription-op-tin-form-to-after-post-content-in-genesis-without-a-plugin*/

#newsletterbox {
    background-color: #f5f5f5;
    border: 10px solid #e4e4e4;
    margin-top: 30px;
}
#newsletterbox .white-border {
    border: 1px solid #fff;
}
.newsletterbox-wrap {
    background: url("http://i39.tinypic.com/1rq0pu.jpg") no-repeat scroll left top transparent;
    margin: -17px -18px;
    overflow: hidden;
    padding: 45px 30px 40px;
    text-align: center;
    text-shadow: 1px 1px #fff;
}

.newsletterbox-wrap h4 {
    text-align: center;
    font-size: 26px;
}

.newsletterbox-wrap p {
    margin: 0 35px 20px;
    text-align: center;
}
.newsletterbox-wrap input[type="email"] {
    background: url("http://i41.tinypic.com/33tsbxz.png") no-repeat scroll left center #fff;
    box-shadow: 0 0 5px #ccc inset;
    color: #999;
    font-family: 'proxima-nova',sans-serif;
    font-size: 12px;
    margin: 0 5px;
    padding: 15px 0 15px 45px;
    width: 40%;
}

.newsletterbox-wrap input[type="submit"] {
    box-shadow: 0 1px 1px #a24a1d;
    font-size: 14px;
    font-weight: bold;
    padding: 10px 15px;
    text-transform: uppercase;
}
- save your style and preview
Troubleshooting Options
you can change size=”50″ to 25 , 30 or any choosing size of your choice , same for color codes text and other default items contained in this tutorial .
Concluding Lines on adding mailchimp auto-responder / subscription opt-in form:
For business it is a recommended practice to allow users subscribe to your list instead of forcing it on them. Feed burner is also a great option to use under your post content it is also provided in the css code above . If you want to use only feedburner form you will need replace the newsletter.php with a feedburner uri I will provide to you in the discussion . In just 1 hour after implementing this I have gained 90 subscribers to the list I just created for this . see screenshot below

Think I ‘ve omitted something ? Discuss it
 Configuring the mailchimp Subscription / opt-in form :


I am lost after this point -> Copy the generated code and paste it in a text editor (notepad recommended ): I have copied the embed code from my mailchimp account. But i dont get the below and steps after that…
“Copy only the form action area and post it in an open notepad window taking note of the following parts ; form action=”” , u=”” and id=”” as highlighted in the screenshot below” …
Would be awesome if you could elaborate. Kinda need the help.
Hi Mayur,
You’ll need extract the only the contents of the [form action=”” , u=”” and id=””] values from the code you’ve copied and substitute same in the code snippet given in this tutorial.
Hi Obasi,
Thanks for that. But i need a bit more help. I have saved the file (click on file ==> save ==> save it as => newsletter.php) . Post this, there are no instructions given for blogger users . Instructions for WordPress user are there.
Please let me know the last few steps where i got to insert/upload the newletter.php file to.
What theme are you trying to implement this on? Blogger?
That’s right, i am working on Blogger.
for blogger, you’d need to follow after the guide here.
Indded a very good article !! Thinking to add mailchimp opt in form on my genesis blog using your tutorial.
Thanks for sharing this information with us, I will try it .
Please how to add it to other themes apart from genesis
adding it to other themes on wordpress doesn’t require any additional configuration . All you need do is ignore the function.php part and copy the content meant for newsletter.php to after content on single.php or simply paste it using your quick adsence plugin
Wow!very helpful post.you are a genius buddy.
thanks for finding this little post useful, hopping to get more of your feedback in the future
This post is so explanatory. And the option of mail chimp is nice. But, What if I don’t want to touch the style how will the form look like and, can I use the first code for other mailing list provider?
without the touching the style your form will still look cool but without the sign-up wrap and box around it . Yes you can use for any other newsletter opt-in form it by replacing those variables
You have said it all. Nice tutorials for newbies and well illustrated with simple english. But my honest opinion is that Mailchimp are kinda wicked or strict with their services. They will just decide to ban accounts for no reason without notification. I think that is cruel act. I prefare listwire anyway.
I have really never heard of listwire, just seeing it for the first time now , will consider exploring their services in the future. I always advice persons using a particular service to read through their terms and services ‘cos no sane company will ban rule abiding users
Obasi, thanks for this great post. I have been thinking of how to automatically add a mailchimp subscription form to my posts. I have actually been doing it manually.
However, at the moment, I would rather have someone handle it for me than play with my files because am not yet grounded in that area of changing or modifying the codes in my functions file. Thanks all the same. It’s such a nice post.
I can offer you extra help for free via skype or google hangout depending on the one you are more comfortable with