Do you have an old Android phone lying around? Instead of letting it gather dust, why not repurpose it into a portable projector? With a little creativity and the right tools, you can transform your outdated smartphone into a device for movie nights, presentations, or gaming.
It’s a cost-effective way to breathe new life into your old phone while unlocking its potential for entertainment or productivity.
In this article, we’ll explore three practical and fun ways to turn your old Android phone into a portable projector, complete with step-by-step instructions and tips to get the most out of your setup.
-
DIY Smartphone Projector Using a Shoebox
This method is a fun, low-cost way to create a portable projector. It relies on basic materials you likely already have at home.
What You’ll Need:
- Your old Android phone
- A shoebox or any sturdy cardboard box
- A magnifying glass (preferably 3-4 inches in diameter)
- Black tape or glue
- A pair of scissors or a utility knife
- A smartphone stand or mount
- Darkroom for optimal viewing
Steps to Create the DIY Projector:
- Prepare the Shoebox:
- Cut a hole in one side of the shoebox that matches the size of your magnifying glass. This will serve as the projector’s lens.
- Secure the magnifying glass over the hole using black tape or glue. Ensure there are no gaps for light to leak through.
- Line the Inside with Black Paper (Optional):
- For better image quality, line the interior of the shoebox with black paper or paint it black. This minimizes light reflections inside the box.
- Place the Smartphone Stand:
- Position a smartphone stand inside the box to hold your phone in place. The phone’s screen should face the magnifying glass.
- Adjust the Phone’s Display:
- Rotate your phone’s screen upside down. You can do this by enabling auto-rotation and flipping the device manually or using a screen rotation app.
- Increase your phone’s brightness to the maximum for better visibility.
- Test and Adjust Focus:
- Move the phone closer or further from the magnifying glass until the projected image is in focus.
- Project onto a Wall:
- Darken the room, and aim the shoebox at a white wall or projector screen.
What to Expect:
This DIY method is simple and inexpensive, but the image quality won’t match that of professional projectors. It’s a great option for casual use, such as watching a movie or sharing photos with friends.
2. Use a Smartphone Projector Kit
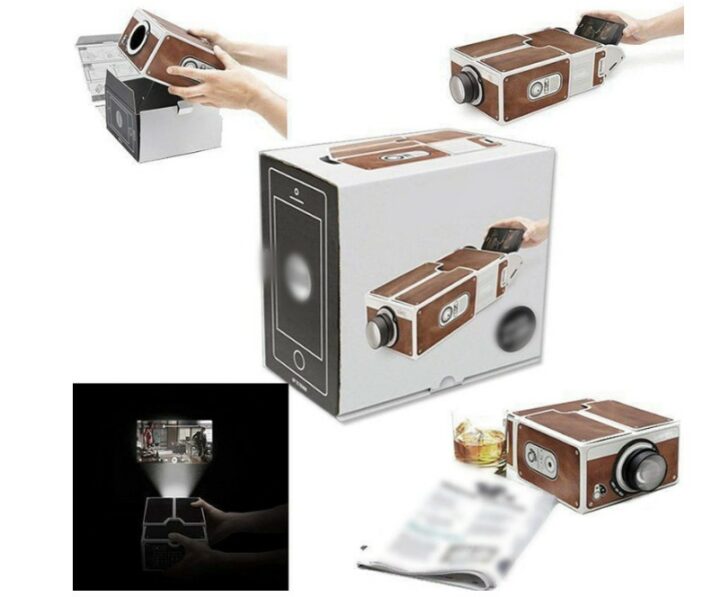
For a more polished and user-friendly setup, consider purchasing a smartphone projector kit. These kits are affordable and specifically designed to transform your phone into a functional projector.
What You’ll Need:
- A smartphone projector kit (available online for $10 to $30)
- Your old Android phone
- A darkroom or dimly lit space
How It Works:
- Assemble the Projector Kit:
- Most kits come with pre-cut cardboard pieces, a magnifying lens, and assembly instructions. Follow the guide to put the kit together.
- Insert Your Phone:
- Place your phone in the designated slot inside the projector. Ensure the screen faces the magnifying lens.
- Adjust the Focus:
- Use the kit’s built-in adjustments to focus the image.
- Project Your Content:
- Darken the room and project onto a flat, white surface for the best results.
Why Use a Projector Kit?
- Convenience: Kits are designed to eliminate the guesswork involved in creating a DIY projector.
- Portability: These kits are compact and lightweight, making them easy to carry.
- Affordable: They’re a budget-friendly alternative to purchasing a full-fledged projector.
Limitations:
While the image quality is better than the DIY shoebox method, it still won’t rival professional-grade projectors. However, it’s perfect for casual entertainment.
3. Connect Your Phone to a Portable Pico Projector
If you’re looking for better image quality and ease of use, investing in a portable pico projector is the way to go. These compact devices are designed to work seamlessly with smartphones, making them a great option for repurposing your old Android phone.
What You’ll Need:
- Your old Android phone
- A portable pico projector (prices start around $50)
- HDMI or wireless connectivity options (depends on the projector model)
- A dark or semi-dark room
Steps to Set Up:
- Choose the Right Pico Projector:
- Look for a projector compatible with Android phones. Some popular options include the Anker Nebula Capsule, Apeman M4, and Vamvo Ultra Mini Projector.
- Connect Your Phone to the Projector:
- Via HDMI Cable: Use an HDMI adapter compatible with your Android phone to connect it to the projector.
- Wireless Connection: If the pico projector supports Wi-Fi or Bluetooth, use screen mirroring or a dedicated app to connect your phone.
- Adjust Settings:
- Configure the projector settings for optimal brightness and focus.
- Play Your Content:
- Use your phone to stream movies, play games, or give presentations.
Why Choose a Pico Projector?
- Superior Quality: Delivers sharper images and better brightness compared to DIY methods.
- Ease of Use: Minimal setup required.
- Portability: Small enough to carry anywhere.
Drawbacks:
- Higher cost compared to DIY methods or projector kits.
- Requires an initial investment in the projector.
Tips to Maximize Your Experience
- Choose a Dark Room: Regardless of the method you choose, darker environments improve image clarity and contrast.
- Use a Stable Surface: Ensure your phone and projector setup are on a steady surface to avoid disruptions.
- Boost Audio: For better sound, connect your phone to an external speaker or soundbar.
Final Thoughts
Repurposing your old Android phone as a portable projector is a creative and practical way to get more use out of an otherwise forgotten device.
Whether you prefer the DIY route with a shoebox, a ready-made projector kit, or the superior performance of a pico projector, there’s a solution for every budget and need.
So, dig out that old phone and start projecting your favorite content onto the big screen! The video below gives more insight on how to archive these with ease:
Which method will you try first? Let us know your thoughts and experiences in the comments.


